
Simple Digital Sensor code
Writing a simple code for digital sensors using Arduino UNO
SIMPLE ARDUINO CODES
12/3/20243 min read

Exploring the IR Sensor: A Beginner’s Guide
Infrared (IR) sensors are versatile and widely used in projects ranging from robotics to home automation. They are simple to use and an excellent starting point for students learning about digital electronics. In this blog, we will dive deep into how IR sensors work, how to set them up, and how you can test them to understand their functionality.
What is an IR Sensor?
An IR sensor detects objects or obstacles by using infrared light. It consists of two primary components:
IR Transmitter: Emits infrared light (invisible to the human eye).
IR Receiver: Detects the reflected infrared light from an object.
When an object comes within the sensor’s range, the IR light is reflected back to the receiver, triggering the sensor to output a signal.
How IR Sensors Work
The sensor operates based on the concept of reflection and light intensity. Here’s a breakdown of its functionality:
No Object Present: Infrared light travels in a straight path and doesn’t return to the receiver. The sensor outputs a LOW signal.
Object Detected: Infrared light hits an object and reflects back to the receiver. This triggers a HIGH signal.
Most IR sensor modules also feature an onboard potentiometer that allows you to adjust the detection range.
Why Use an IR Sensor?
IR sensors are commonly used because they are:
Cost-effective: Affordable and readily available.
Versatile: Suitable for various applications such as obstacle detection, line following, and touchless operations.
Easy to Use: Simple to connect to microcontrollers for quick testing and prototyping.
Components Needed to Test an IR Sensor
To test an IR sensor, you’ll need the following:
IR Sensor Module
Microcontroller (like Arduino)
LED (optional) to visualize output
Jumper Wires
Breadboard
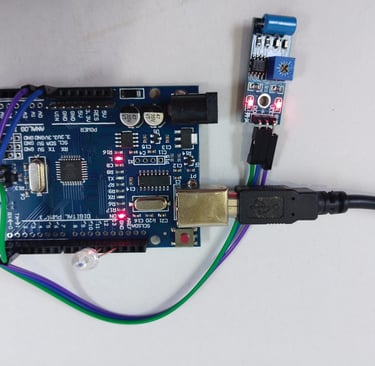
Setting Up the IR Sensor
Power Connections: Connect the sensor’s VCC pin to a 5V source and GND pin to the ground.
Output Pin: Connect the OUT pin to any digital input pin of your microcontroller.
Testing the Output: Use a multimeter or microcontroller to check the sensor’s output as you bring an object closer.
How to Test the IR Sensor
Place the Sensor on a Flat Surface: Ensure that the sensor faces upward and has a clear line of sight.
Adjust the Potentiometer: Rotate the potentiometer on the module to set the desired detection range.
Bring an Object Closer: Slowly move your hand or an object toward the sensor. The onboard LED (if present) should light up, indicating detection.
Common Applications of IR Sensors
Obstacle Detection:
IR sensors are widely used in robotics for detecting walls, barriers, or objects. This makes them integral to obstacle-avoiding robots.Touchless Devices:
Used in automatic doors and sanitizer dispensers, IR sensors detect when someone approaches.Line Following Robots:
In combination with multiple IR sensors, these are used to identify and follow lines on a surface.Proximity Sensors:
Used in phones and other gadgets to detect when an object (like your hand) is near the device.
Troubleshooting Tips
False Triggering:
IR sensors can sometimes detect light from other sources. Adjust the potentiometer to reduce interference.Low Sensitivity:
Check the sensor’s alignment and ensure there are no obstructions on the receiver.No Output:
Verify the wiring and ensure the sensor is getting power.
Why Should Students Explore IR Sensors?
Working with IR sensors introduces students to key concepts in electronics and sensing technology. By testing and experimenting with them, students develop:
Practical Understanding: Learn how sensors interact with the environment.
Problem-Solving Skills: Troubleshoot real-world challenges during setup and testing.
Project Inspiration: Apply the knowledge gained to create exciting projects like automatic lights or robots.
Conclusion
IR sensors are simple yet powerful components that can add intelligence to your projects. By understanding how they work and testing them yourself, you can unlock endless possibilities for innovation. Whether you're a school student curious about technology or an engineering student building a robot, experimenting with IR sensors is a great way to kickstart your journey.
Start exploring today, and let your creativity guide you toward your next big project!
Keywords: IR sensor, obstacle detection, proximity sensor, digital sensor, electronics for students, robotics sensor, touchless technology